Window & door planning
Window Parts Diagram: A Guide for Winter Springs, Florida
Learn how a window parts diagram can help identify frame, sash, trim and hardware, then gather clear product details before discussing your project.

If you are trying to describe a window component, a window parts diagram can give you the vocabulary—but it cannot tell you by itself which replacement part fits. Start by locating the frame, sash, glass and trim, then identify hardware according to the window style. A sash may move or stay fixed, and some fixed windows hold glass without a separate sash, so the visible arrangement matters. Recording where the component sits and what you observe is more useful than guessing at a diagnosis. This guide explains how to read the main parts, distinguish interior trim from exterior features, and recognize hardware on hung, casement and sliding windows. You will also get a compact location guide and a checklist for gathering product details before discussing your project.
Key Takeaways
- A window parts diagram labels the frame, sash, glass, trim and hardware so homeowners can describe visible components.
- The frame surrounds the assembly, while the sash holds glass and may be movable, fixed or absent on some fixed windows.
- Trim names become clearer when you distinguish the exterior sill from the interior stool, apron and casing.
- Window style, component location, visible product markings and photos help describe a concern without diagnosing it.
What Is a Window Parts Diagram?
A window parts diagram shows how a window’s frame, sash, glass, trim and operating hardware are arranged, helping you identify and describe a visible component. The frame surrounds the assembly, while the sash holds the glass and may be fixed or movable. Some fixed windows hold glass directly without a separate sash.
Read the Frame and Sash Diagram
Read a diagram from the outside structure inward: the frame surrounds the window, with a head at the top, jambs along the sides and a sill at the bottom. The sash holds the glass. Its horizontal pieces are rails; its vertical pieces are stiles. On a double-hung window, the upper and lower sashes slide vertically and meet at a check rail. A fixed window may have a stationary sash, while some fixed designs hold glass directly without a separate sash.
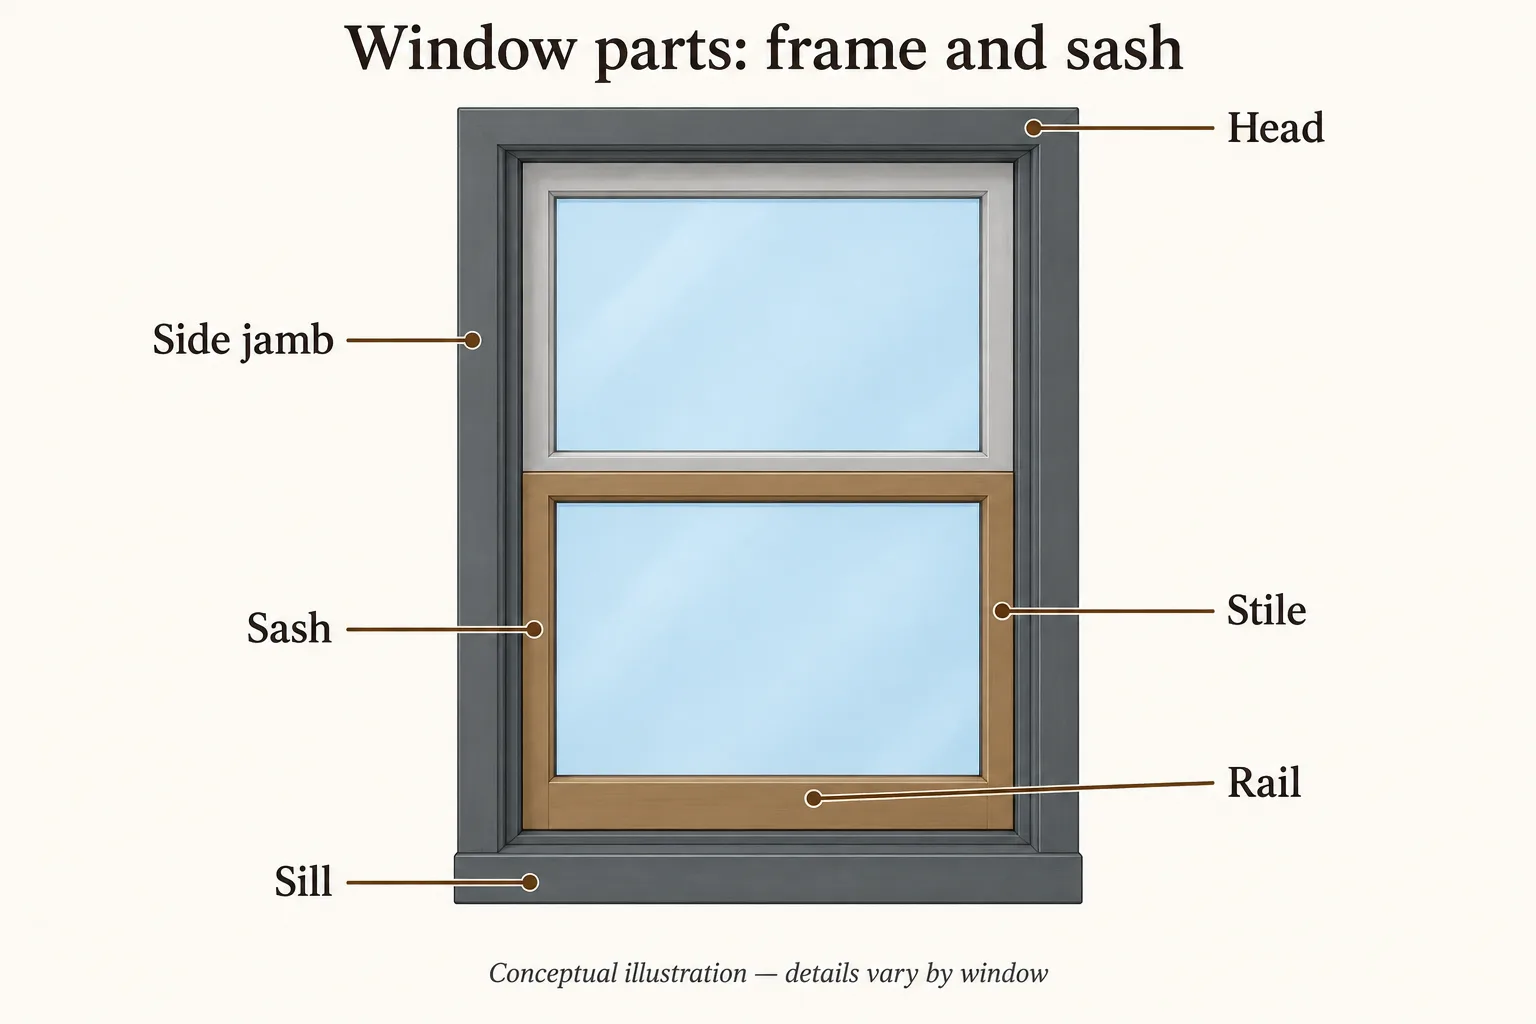
Use the parts’ positions to describe what you see rather than assuming nearby pieces are interchangeable. For example, a mark on a stationary side jamb is in a different location from one on a moving sash. That distinction can help someone understand your description, but it does not identify the cause of a problem.
Separate Trim From Operating Parts
Trim labels depend on which side of the window you mean. The exterior sill is at the bottom outside; the interior stool is the shelf-like ledge at the bottom inside. An apron is the trim below that stool. Casing covers the gap where the frame meets the wall. Use location and side—not just a part name—when describing a concern.
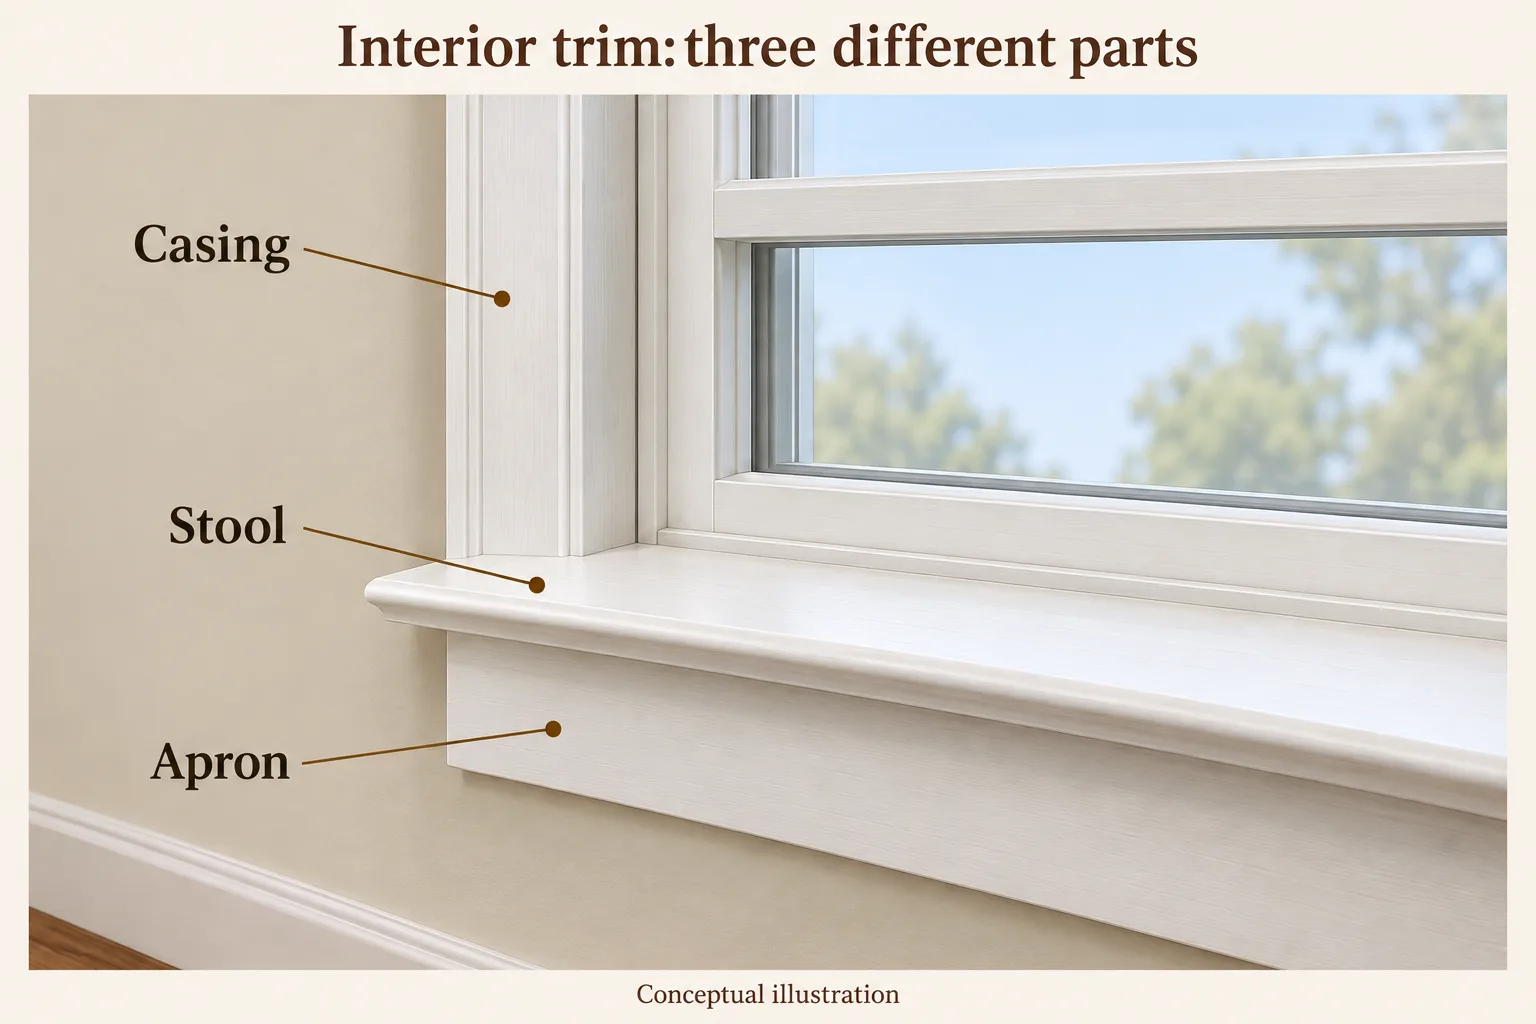
| Feature | Where to look | Useful description |
|---|---|---|
| Exterior sill | Bottom, outside | “Outside bottom edge” |
| Interior stool | Bottom, inside | “Inside ledge” |
| Apron | Below the interior stool | “Trim below the ledge” |
| Casing | Along the frame-to-wall gap | “Trim around the frame” |
| Sash | Around the glass, within the frame | “Moving” or “fixed glass-holding section” |
Match Hardware to the Window Style
Hardware varies with the window’s movement. On hung windows, balances counterbalance the sash and are often hidden in the side jambs; locks and tilt latches are other possible components. A casement typically uses hinges and an operator, the mechanism that moves the sash. A horizontal slider may use tracks and rollers to guide movement. Parts and arrangements can differ between systems.
A generic drawing helps you learn vocabulary, not confirm compatibility. A hidden balance, for instance, may not be identifiable from a quick view, and one symptom alone does not establish that it has failed. Record the window style and the part’s apparent location. A familiar part name or diagram is not proof that a particular replacement will fit.
Record Details Before the Project Conversation
Before describing a project, collect details that help distinguish this window from others. Take an overview photo that shows its style and a close-up of the area you are asking about. Note the room or opening, the component’s position, and what you observe. If a manufacturer or model marking is safely accessible, record it as written; do not force a window or remove hardware to find a label.
Marking locations vary. Andersen, for example, says users should have the Product ID ready for support and notes that window IDs are commonly at the top of the frame when open or etched into the glass logo. That is an example, not a rule for every brand. Pair the marking with your own description rather than relying on it alone.
A useful note might say: “Upstairs bedroom, double-hung window; close-up of the lower sash; marking recorded from the frame; concern is near the side.” This reports style, location and observation without claiming a diagnosis.
FAQs
What does a window parts diagram show?
A window diagram labels parts such as the frame, sash, glass, trim and operating hardware. The frame surrounds the assembly; the sash holds glass and may move or remain fixed. A diagram can help you describe what you see, but a generic drawing does not establish which replacement part fits a particular window.
How do I identify the right window part?
Start with the window style and component location, then note any safely visible manufacturer or model markings. Add an overview photo and a close-up of the concern. These details can make your description clearer, but they do not diagnose the cause or prove that a similarly named part is compatible.
Are a window sill and stool the same part?
Window trim names depend partly on where the piece sits. The exterior sill is at the bottom outside, while the interior stool is the shelf-like ledge at the bottom inside. An apron is below the stool, and casing covers the gap between the frame and wall. Describing location helps avoid confusion.
Conclusion
A window parts diagram helps you name what you see, but a label alone cannot confirm an exact replacement part. Record the window style, component location, visible product markings and what you observe. For a practical next step, call Windows and Doors by Martin Toro and ask about your project.